Gordon Robertson
Get A Grip
Please Note
I was unable to finish this project because the COVID-19 outbreak shut down the facilities I was relying on to access and work on my model.
Project Goals
-
Use clay to create a model of an ergonomic grip that improves upon an object.
-
The model cannot be more than 6" in any direction so it can be turned into a mold later.

I was thinking of objects that I use a lot and are uncomfortable to hold, then it hit me.

My phone.
I use it a lot in bed, as pictured above, and the phone itself is very thin and has a very sleek yet slippery coating.
Adding a customized grip to the phone would make it much better.

I have a Galaxy s9, which is very slippery and hard to hold normally.
Initial Thoughts
The Creation Process
.png)
The process in a picture
Ideation
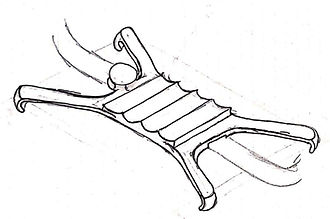
At first, my design was a large,
X-shaped case with features for a place to wrap my earbuds around and a slot for a velcro strap to go into.
However, after discussing the design with my professor and receiving feedback,
I tweaked it to be a smaller,
sleeve-like design.
Mold Making
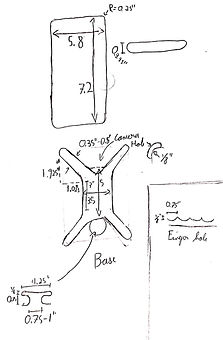
To prepare for the mold, I 3D printed a model of the s9 I found online to serve as a base.
I had never worked with clay in this capacity before and decided to break the work up into chunks to make it more approachable and manageable.
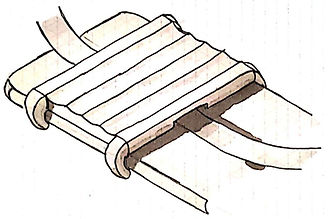
Rough Shape and MVP
The first step was to create a rough shape of the grip, learn how the tools I had worked, evaluate any possible hurdles in my way.
I wanted to create the minimum viable product of my design first to acclimate myself to the clay.
I learned that a smooth finish would take time, thin features are very had to make, and precise sharp corners are also hard to make.

Smooth Surface and Final Shape
The next step was finalizing the shape of the grip itself and mastering the tools.
This was a lot of very slow and methodical work to achieve a smooth finish as well as some re-evaluation of how tall I wanted the grip to be and where I thought the attaching arms would go.


Tweaking
Finally, I focused on really sculpting the attachment arms into something that was organic, comfortable, and strong without being too thin. I moved where they were from the original design to attached to a ridge as it felt more organic.
Once again this was a lot of trial and error but I found a tool I had could be used to roughly standardize the shape of the arms.


The Next Steps
Due to COVID-19, I was unable to complete this project.
This next section focuses on the steps I would have taken if I had the opportunity to.
Rebuilding
I believe that the creative process requires iteration so I decided that now that I had an MVP, I should focus on making a more accurate and feature-rich version.
I 3D printed a higher resolution version of my phone with a cutout for the velcro strap and a cut-off at the top to mark a sharp stopping point. This would enable me to easily make a sharp and flat end.

Take Finalized Pictures
To fully and adequately document this, I would want to well-lit, high-quality pictures of my final product and run them through photoshop.